Kristin, your placement demo is awesome! Just what we needed! Now...if we could only get it added to the 101 thread that would be awesome! Hmmm....I sure miss Jenny_RR!!
You are all very welcome. I've never seen a demo for this anywhere and it seemed so obvious that one was needed. You have no idea how much time this will save me in answering parting and placement questions in emails *kicks feet up on desk*
Shann: I haven't recieved a PM from you. My PM's from this site have always been a bit off. Can you resend it to Info@YourHairShop.com ?
Stacey: No kidding huh! I've already ran my boyfriend over this demo a few times so I can get him ready to help me with my new install next week. He knows more about hair than he ever wanted to
monsterita: Great job! That's exactly what I would do.
If anyone has any other ideas of demos they'd like to see please PM them to me and I'll do my best get them posted for you.
Synne - do not apologize for spelling errors...this is a place to share...I had commented about this in another post and am very sorry about it...please, don't give it a second thought!
I won�t . It was just to point out that my words maybe not be spelled correctly, but I hope that I make sense anyway.
And let it be now .
Aphrodite
Members Profile
Send Private Message
Find Members Posts
Add to Buddy List
Banned
Joined: December 15 2005
Status: Offline
Points: 0
Synne - do not apologize for spelling errors...this is a place to share...I had commented about this in another post and am very sorry about it...please, don't give it a second thought!
Very generous of you to spend the time making such a clear and detailed demo. I am sure this will help a great many people learn to properly place their bonds/wefts/links. I wish I had seen a demo like this when I first started doing my own extensions- I would have avoided some of my more , ahem, cruddy installs- from which I ended up with wasted $, hair and time. Ya live and learn, I guess.
You must have some very very happy customers- your work is beautiful
That demo is absolutely awesome. Thank you so much Kristin! Now
instead of trying to explain to my fiance how to section my hair, I can
just show him. Poor guy, he doesn't have an excuse for crappy
sectioning anymore...
shann2525
Members Profile
Send Private Message
Find Members Posts
Add to Buddy List
Newbie
Joined: September 16 2005
Status: Offline
Points: 85
I haven't yet seen a demo on the web for parting and placement so I went ahead and made one. Along with this demo there are a few other new ones up on my site. Enjoy.
Read First-
There are many ways to part hair during installation- this is just one of them.
Please note that each head is completely different due to the different densities of hair, size of heads, and the amount of hair intended to be installed. Your installation will almost certainly not be exactly like this demo.
Practice installation on a mannequin head before you install hair on a person to perfect your method and gain knowledge of the application and removal techniques. Mannequin heads are available in our online shop or in your local cosmetology school supply store.
*Click Photo to enlarge*
Step 1
Installation begins from the bottom and goes upward. Section the clients hair into 4 sections: The front-right section, front-left section, the top-back section, and bottom-back section. Clip all sections out of the way except for the bottom-back section which we will work with first
(as shown above).
Step 2
To avoid extensions showing during wear, no extensions should be installed closer than 1-1� inches from all hair lines and parts. The above picture shows an approximation of where to place your first row of extensions.
Step 3
Use some duck-bill parting clips (shown above in silver) to keep loose hairs out of the way. The above red X's indicate the suggested placement for your extension bonds- yours may vary. Notice how we left a little room on each side of the row to stay away from the hair line. Next, create another row about � - � of an inch above the first one. Some people leave no hair between rows and some do- the choice is yours. See step 7 for examples of the row parting.
Step 4
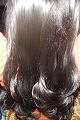
The above picture is an example of what your highest row in the back may look like. We do not suggest going any higher than this to avoid seeing any of the bonds during wear. For medium or fine/thin hair it is common to have your highest row 1-2 inches lower than the one shown above. The object of placing the last row is to go as high as you can with out the bonds showing when you let the client's hair down.
Step 5
Once the back is done we can move over to the sides.
The rows should begin about 1-1� inches from the hair line around the ear. The X's represent possible bond placements must be placed back from the hair line as shown.
Step 6
This is an example of what your top row on the side of the clients head may look like. This mannequin hair is naturally parted in the center so we stayed about 1-2 inches below their natural center part. Be sure to find out how your client regularly parts their hair so you can stay about 1-2 down from that.
.
Step 7
Here is a general picture of where all of your rows may be placed.
Quick Tip-
Quick Tip
Highlights
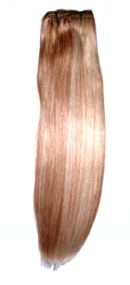
If you are trying to place two colors and create a highlighted look here in an example of what your placement may look like. Red X's represent one color and yellows another. There's no set pattern and we have found that placing them a little sporadic like shown above gives more of a natural look.
If a client has thick streaks you may want to try and follow their color pattern. Let's say they had blonde and brown streaked hair- you would attaching brown extensions to their brown hair and blonde extensions to their blonde hair. This tends to look really natural.
You cannot post new topics in this forum You cannot reply to topics in this forum You cannot delete your posts in this forum You cannot edit your posts in this forum You cannot create polls in this forum You cannot vote in polls in this forum


 Topic Options


 Post Options
") Thanks(0)
Thanks(0)


 Aphrodite wrote:
 .
. .
.


 cruddy installs- from which I ended up with wasted $, hair and time. Ya live and learn, I guess.

 and "----" is a weft)
 .
.


