"How To" Hair Tips "Tips & Tricks for the Most Sought After Styles" Straw Set, Sleek Wrap, Doobie (Dry) Wrap, Braids, Locs
The Straw Set (pictures courtesy of Afam Concept, Inc.)
Wearing a straw set is a great way to eliminate the need for a lot of combing and a great style to try while in the transition of going natural. To get this look, you will need drinking straws or even small perm rods for slightly bigger and looser curls, setting lotion, and hair end tissue papers. Step 1: Shampoo and condition hair and saturate it with setting lotion. Step 2: Part you hair into 1/4 to 1/2 inch sections and place end papers on the end of your hair. Step 3: Roll your hair onto the straws and secure it with a hair pin. Step 4: Repeat steps 1-3 until you have finished your entire head. Step 5: Dry your hair under a hard hat or bonnet hair dryer Step 6: Remove the straws and separate curls with your fingers For this style, you will only need to finger comb your hair, but be sure to spray it with oil sheen so it won't get too dry.
Sleek Wrap
A wrap set is a great way to get a sleek look! You will need a comb, setting lotion and hair clips (these are optional depending upon how long your hair is) and/or some paper wrap strips. Step 1: Shampoo and condition your hair and apply setting lotion Step 2: Use your comb and comb/wrap your hair around in a beehive or circle, blending the hair together all around your head Step 3: Secure where you hair joins with hair clips, or you can place a wrap strip around your head to secure your hair in place Step 4: Dry your hair under a hooded dryer, remove clips or wrap strip and comb and style
Doobie Wrap (Dry Wrap or Roller Wrap Set)
To do the roller wrap set, also know as the doobie, you will need to roller set your hair, dry it under a hooded dryer, take the rollers out, then comb/brush your hair around in a wrap). Leave it wrapped for a while and when you comb it down, you will have big loose wavy curls with lots of body.
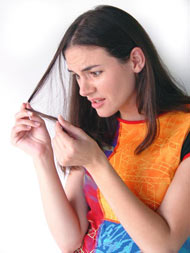
The official name for split ends is Trichoptlosis but no matter what you call them, split ends are annoying and make the hair appear dull and scraggly. The cause of split ends has to do with the protective cuticle, which is stripped from the ends of the hair fibers. Although split ends can happen to all types of hair, typically you will see the most on brittle or dry hair. Other common causes can include excessive brushing, over dying, and brushing the hair while wet.
When the protective cuticle is removed, it cannot be replaced. The result is hair that is not split in two, or sometimes, three strands. Depending on how bad the split end, it can be anywhere from one-eighth to one inch long. While there are several options for treating split ends, the best one is to cut the damaged fibers off.
Many people with split ends think that they have to change their monthly trim to once a week. In fact, that is not necessary. To prevent split ends from becoming worse, you can do other things, including trimming them yourself. Now before you panic, keep in mind that women do trim their own hair all the time and no one is the wiser. Even supermodels will trim their own hair between appointments!
If you have split ends and think, you want to try to trim them yourself, simply follow these recommendations:
Start by taking small sections of hair and then twist them carefully going into a downward motion. What will happen is that the split ends will stick out.
Make sure your scissors are sharp and then snip into the twisted strands without cutting right through. The goal is to cut into the thick portion of the gathered strands so the damaged protective cuticles can be removed and the hair now has a natural, layered effect.
The key is not to cut randomly but to keep the amount of hair cut from each section the same
Remember that split ends can happen to people of both genders and all ages. In addition to the causes already mentioned, other things that are potential problems are using styling tools that are inferior. This means that the tools are snagging or ripping the hair, thus damaging it. Typically, this would include tools such as synthetic combs or brushes, brush rollers, and so on.
Using permanents, hair color, and relaxers or straighteners too often will also lead to split ends along with damage caused by environmental change such as extreme heat or cold and harsh winds, trying to detangle your hair improperly, washing your hair too often and with poor quality products, overuse of waxes, sprays, and gels, and actually having your hair cut with poor quality scissors.
Splits ends also come with numerous myths, which we will put to rest right here:
Once you have split ends, you can never get rid of them. Well, as you have seen from the information provided in this article, that is simply not true.
Split ends can be fixed in that the split is actually repaired. In truth, once a hair fiber is split, it is split. However, you will find some products that will glue the ends back together temporarily but it is not a permanent fix.
To ensure you avoid the dreaded split end, make sure you shampoo your hair with a quality product and use one that has Phytojoba or some other type of moisturizing formula. After conditioning your hair, make sure it is completely rinsed out of the ends. Additionally, after your hair has been rinsed with warm water, you want to do a final rinse of cool to cold water. This will help seal the protective cuticles while giving your hair a sleek shine.
For the next steps, always towel blot your hair, never rubbing rough. After blotting, apply a good leave-in conditioner to the damp hair. Great options include Sebastian�s Potion 9 or Phyto 7 or 9. Then, use a wide-tooth comb to get rid of tangles. For extra shine, rub a dime-size amount of Phytolisse or some other shine product in your hands and then apply to your hair.
Finally, to blow dry your hair, use a round brush or large paddle along with the blow dryer, making sure your hair is fully dried. The goal is to ensure the ends are dried straight since wavy or curly split ends will show up more. Then when your hair is dry, use a heat protecting spray and ceramic flat iron on just the bottom two inches of your ends. You will find after going through this process that your hair looks healthy, sleek, and the split ends vanish from sight. The only thing you need to remember is that unless the split ends are cut off, this is just a temporary solution.
Edited by cmesweet
Natural
BC May 9, 2004
cmesweet
Members Profile
Send Private Message
Find Members Posts
Add to Buddy List
Elite Member
Joined: March 31 2004
Status: Offline
Points: 2085
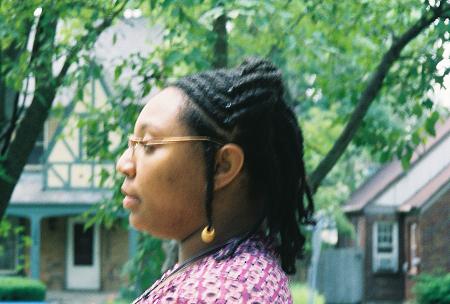
I am wondering if anyone has any information on tree braiding. I plan to get my done soon and my stylist isn't sure exactly how to do it. She said she thinks is similar to crochet braiding, but I have no clue. I saw pics of it in DSD's album, but I have been unable to get my hands on any real instructions online - only videos. So-o-o-o-o-o if anyone knows how to do it or knows where I can find some written instructions, I'd really appreciate it!
TIA ladies!
Lala
HHC began 08/05, BC 11/05. Healthy & nearly BSL 02/07!
I am wondering if anyone has any information on tree braiding. I plan to get my done soon and my stylist isn't sure exactly how to do it. She said she thinks is similar to crochet braiding, but I have no clue. I saw pics of it in DSD's album, but I have been unable to get my hands on any real instructions online - only videos. So-o-o-o-o-o if anyone knows how to do it or knows where I can find some written instructions, I'd really appreciate it!
TIA ladies!
Lala
Well its hard to explain the process but the videos (even though I know you dont wanna get them if you dont have too) is more helpfull IMO. But I know someone out there can help more than I could in explaining tree braiding. HTH
I am wondering if anyone has any information on tree braiding. I plan to get my done soon and my stylist isn't sure exactly how to do it. She said she thinks is similar to crochet braiding, but I have no clue. I saw pics of it in DSD's album, but I have been unable to get my hands on any real instructions online - only videos. So-o-o-o-o-o if anyone knows how to do it or knows where I can find some written instructions, I'd really appreciate it!
TIA ladies!
Lala
I just got tree braids 3 weeks ago and I adore them. I did not allow the stylist to put glue to secure though. It does shed more, but I don't want the glue.
My tree braids were done the following way.
In the back there are maybe 3 rows of individuals, so I may wear an up-do. I have about 25 small conrows braided from front to back
As she cornrows the hair with the human hair, she leaves the HH out like tree branches. Your hair is not out at all though. She has to continue to add hair to the same cornrow. It took two bundles, but I wanted the fullness. You can use less, up to you.
It takes about 4 hours and last about 6 to 8 weeks.
Not sure if I explained it well, but if you search on tree braids, there is someone with pictures and instructions. I will see if I can find and post for you.
LovelyLisa
Members Profile
Send Private Message
Find Members Posts
Add to Buddy List
Junior Member
Joined: September 30 2005
Status: Offline
Points: 199
Hey LovelyLisa and ThAbAdDeStBaBy! That was very helpful! I tried to explain that to her the way you did to me but I think I botched it up! I will print the directions and show her the pics and I think she can do it! Thanks again!
HHC began 08/05, BC 11/05. Healthy & nearly BSL 02/07!
cmesweet
Members Profile
Send Private Message
Find Members Posts
Add to Buddy List
Elite Member
Joined: March 31 2004
Status: Offline
Points: 2085
Flat Straight Insert a 2-inch section of hair between the plates, then squeeze the handle together and glide slowly through hair from the roots to the ends.
Soft Curls Insert a 2-inch section of hair between the plates gently squeeze handle together and glide iron to the ends, then wind hair around plates.
Flip Out Insert a 2-inch section of hair between the plates, then squeeze the handle together and glide slowly together hair beginning at the roots, slightly flip out the ends.
Flip In Insert a 2-inch section of hair between the plates, then squeeze the handle together and glide slowly together hair beginning at the roots, slightly flip in the ends.
You cannot post new topics in this forum You cannot reply to topics in this forum You cannot delete your posts in this forum You cannot edit your posts in this forum You cannot create polls in this forum You cannot vote in polls in this forum


 Topic Options

 Post Options
") Thanks(0)
Thanks(0)


 KBaby wrote:
 Flat Straight