QuoteReplyTopic: First Install Posted: June 17 2005 at 12:57pm
Well I had my hair installed on Wednesday, a friend of mine who is a stylist did it for me. Well..........I had 175 tips ready to go, and she only installed 98 of them. It took her about 3 1/2 hrs, and when I got home I saw just how bad it looked. I have naturally thin fine hair, and it looked even worse then that. So, after I got all the kids into bed I stayed up until 1am putting more shrinkies in. I put in about 40 and still need to put in another 40 or so. Here is what I learned:
Make sure your installer had a better understanding of placement, then just a 5 min internet Drd locks look.
Don't start an install/reinstall at 10pm, and have to get up at 7am
Wear capris, not knit ones, but denium or cotton fabric. Here's why, pull the leg of the pants up above you knee, and then shove the handle of the mirror into the pants. It's like having a 3rd hand!!!
I bought the "cheapy" heat wand that was listed in prior topics, and it works great!!! It is dual sided, and shrinks those baby's down real fast!!
Attach your hair strand to the shrinkie before loading it onto your threader. I did this by inserting the pretip into the shrinkie, then took the heat wand and melted part of the shrinkie to the tip. Works FABULOUS!!!!!
Book a massage after your install!! My back and butt hurt from sitting on the hard counter for 3 hrs!!!!
I am going to finish installing and replacing this after noon, I'll post pics after I am done.
Oh, also, I pretipped with epoxy, not sure if this is the way to go, easy to work with, but the tips are rock hard!!! I am thinking next time of trying either Aleen's or ???? Any suggestions???
CandiLocks27
Members Profile
Send Private Message
Find Members Posts
Add to Buddy List
Junior Member
Joined: May 01 2005
Location: United States
Status: Offline
Points: 70
noooooooooooooooooo no no no no dont pre tip with epoxy!!!!!! it sticks
to their hair! when you're heating it, it sticks streight to the
clients hair and you have a devil of a time trying to reheat it again
and pull it off.
Hugs!
Candi Locks!
gsmilie
Members Profile
Send Private Message
Find Members Posts
Add to Buddy List
Member
Joined: June 02 2005
Location: United States
Status: Offline
Points: 537
I have not had any problems with the tips melting. I did alot of tests, and this was the only thing that did not melt into the hair. I have had to take lots of tips out and replace them already, and the only residue on my hair has been from the shrinkie glue. Well, back to bathroom counter to finish!!!!
Yeah, especially if you have short hair, you'll need a lot of coverage
and therefore a lot of tips! But don't worry, just keep adding more til
it looks right. :)
And yeah, I always seem to start my installs late at night right before
something important the next day. The night before my college
graduation, I was up until 5am braiding in my new hair. Aaaagh. That's
what I get for procrastinating.
I have been using epoxy for quite some time it dose not stick to hair. I make them in very large peices enough to make 5 tip's. then cut them apart when dry. I trim them down till there very small and just 1/8 of the tip has epoxy on it. They hold up very well I have clients that can only go 1 month before reset and have reused them 3 times!!! Make sure you dont have it on to thick. You can trim the top but you can't do any thing if it's to thick.
sherrie215
Members Profile
Send Private Message
Find Members Posts
Add to Buddy List
Super Elite Member
Joined: December 21 2004
Status: Offline
Points: 4424
what kind of epoxy is it that you girls are using for pretipping? I know there has been alot of debate over using epoxy. I am interested in trying it but have NO CLUE where to buy it, or what it is that I need to look for....
the epoxy I have been using is Pacer techology epoxy quick seting gel bougth at home depo. Lows has one and that is the one that say's causes cancer . This one dose not say that but to be safe wear a mask. I stoped talking about this because of the debate but this is the best stuff I have found for making the tips last and the quickest method. I can do a whole bag in 20 min or less!!!!But like I said go to home depo to get the one I use.
sherrie215
Members Profile
Send Private Message
Find Members Posts
Add to Buddy List
Super Elite Member
Joined: December 21 2004
Status: Offline
Points: 4424
thanks girlie...Im gonna check out some of the epoxy brands. I will check labels and read the warnings and use caution! But I seriously need to find a quicker and easier tipping method!
Actually I tried some stuff the other day called Quick Grip. All purpose Permanent Adhesive. From Walmart in the craft section. Its in a yellow tube & package. It sets up really fast. I made about 25 tips and they were completely solid & dry within about 10-15 minutes or so. I will further test them as soon as I get a chance. There is no cancer warnings on package. Although it does say to avoid prolonged breathing of vapors, contact with skin and to use in well ventilated area...causes throat, nose eye irritation....and the usual warnings about flammability, like all glue labels say. It says it contains acetone and can be thinned or cleaned with acetone, so I would think that the tip residue could easily be cleaned out of the hair with normal products that we use with shrinkie residue. Although I will top coat with nail glue or LG to help prevent any of it transferring into the hair.
Scotchyroo
Members Profile
Send Private Message
Find Members Posts
Add to Buddy List
Junior Member
Joined: February 12 2005
Status: Offline
Points: 397
You know, I've been scratching my head over the numbers to put in people's hair. I did a shrinkie install on thursday on a girl with really thick hair just past her shoulders..... I made up 200 tips because I thought it would look stringy if I didn't put a ton in.
I ended up only putting about 120 in, which isn't that many, and one more would have looked cave-womanish and insane. In fact, we may take the bottom row out on tuesday. There must be logic here, but I'm totally confused.
gsmilie
Members Profile
Send Private Message
Find Members Posts
Add to Buddy List
Member
Joined: June 02 2005
Location: United States
Status: Offline
Points: 537
Well I finished my install. I ended up taking out all of the tips that the "stylist" installed, cutting them in half and then reinstalling. I think that I ended up putting in close to 200 tips in, I lost count after I starting cutting them in half!!! I will post pics once I take and after photo today. It looks great and the shrinkies are so light, after I had my GL installed, my head hurt for about a week afterward. I think that I need to get it trimmed to blend it better, but if I flat iron my head hair it blends really nice.
Marie87--I found that when I used the quick set epoxy I did not have enough working time to make the tips, how do you do it? I ended up starting with the 5 mn set, but found that time to short also so I moved on to the 20-30mn set, but found that to long. They need a 10mn set!!!
Will post pics soon (have to figure out how to do it ;0) )
jodie
Members Profile
Send Private Message
Find Members Posts
Add to Buddy List
Newbie
Joined: June 15 2005
Location: United Kingdom
Status: Offline
Points: 85
That sounds great i cant wait to see the pics, did you have pics of your "stylists" attempts? What type of heat wand do you have? i am in great need of a new one "as cheap as poss"
*jodie*
X
mochachip
Members Profile
Send Private Message
Find Members Posts
Add to Buddy List
Senior Member
Joined: March 15 2005
Location: United States
Status: Offline
Points: 1141
Hi G, I only mix a nickle size at a time. That's enough to do about three big sections that amounts to about 15 tips at 5 peices each so you can make 15 really in 3 min. Then just trim down later. I like to trim before it set's up rock hard but you don't have to. Sherriee, Let us know how it goes but I still have to say I like not haveing a second step!
gsmilie
Members Profile
Send Private Message
Find Members Posts
Add to Buddy List
Member
Joined: June 02 2005
Location: United States
Status: Offline
Points: 537
Jodie-- I have before, after, and then really after pics that I am working on uploading. The wand that I am using is from Wimex. It cost me $40 and that included shipping. It works like a dream!!!
that wand is identical to the one I have, that I paid much more for. I think that its a great buy. I had emailed that company for the info and posted it awhile back, so just to say it again....I dont think anyone would be disappointed with that wand. The only thing it doesnt have that I like is a temperature control.
gsmilie
Members Profile
Send Private Message
Find Members Posts
Add to Buddy List
Member
Joined: June 02 2005
Location: United States
Status: Offline
Points: 537
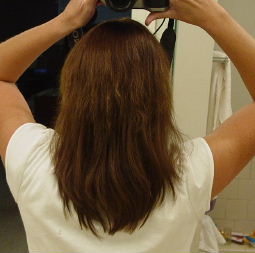
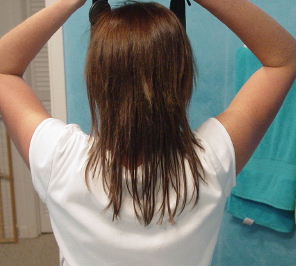
Ok here are the pics. My stylist has the before shot and her cammera is not compatible to my computer without alot of monkey business. So, I have the shots of when I came home from the salon, and then after I put probably another 100 tips in.
As you can see in the top picture, it doesn't look like I have any hair. It is about 98 tips in. YUCK!!! My hair is just above my shoulders and layered so that I could "flip" the ends up.
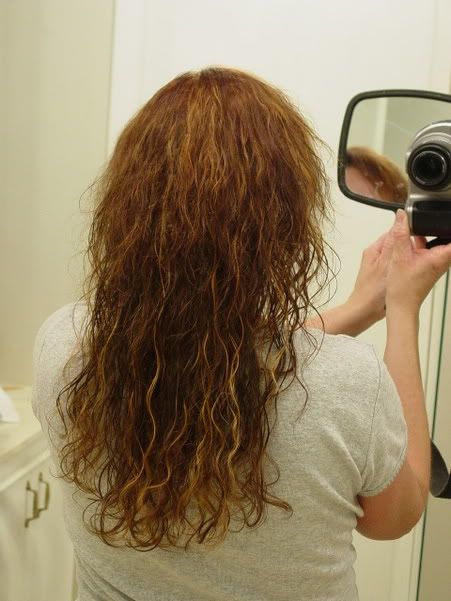
The bottom pic shows after I added probably another 100 tips, but I have not cut it and you can see the line of my "head hair" and my extended hair. What should I do??? If I flat iron it, it looks better, but if I just let it dry (like as shown in the pic) there is a definate line.
I only used 12" hair, I think that I will go longer next time!!!
gsmilie
Members Profile
Send Private Message
Find Members Posts
Add to Buddy List
Member
Joined: June 02 2005
Location: United States
Status: Offline
Points: 537
gs....it looks great now. You did a fantastic job. I do agree that there was definitely not enough hair before and Im shocked that your stylist thought so. But it looks like you did a fine job fixing it!
mochachip
Members Profile
Send Private Message
Find Members Posts
Add to Buddy List
Senior Member
Joined: March 15 2005
Location: United States
Status: Offline
Points: 1141
You cannot post new topics in this forum You cannot reply to topics in this forum You cannot delete your posts in this forum You cannot edit your posts in this forum You cannot create polls in this forum You cannot vote in polls in this forum


 Topic Options

 Post Options
") Thanks(0)
Thanks(0)


 Hugs!
Hugs! Candi Locks!


 So, I have the shots of when I came home from the salon, and then after I put probably another 100 tips in.