QuoteReplyTopic: HELP: How do I make the density lighter on my lf Posted: March 15 2008 at 2:36pm
Hey ladies,
Do u know how to lighten the density on the hairline and the edges of a lace wig. I bought this unit 4 months ago, at Mywigsandweaves.com, it was a stock item (medium size). But now that I've seen Sexibeach's lf's pics and how natural the hairline is I wanna lighten the density on mine.
i would get a thinning comb, there's one at walgreens for like 5 bucks with two sides of blades, and section the hair.. part across the front of the hairline lift the hair straight up and starting thinning from the back of the part at the very base of the cap so you can avoid have little short hairs that stick up.. not the front b/c you don't wanna thin the hairline in the front.. but behind in the part that you have sectioned off..
Asia35
Members Profile
Send Private Message
Find Members Posts
Add to Buddy List
Junior Member
Joined: March 12 2008
Location: United States
Status: Offline
Points: 105
Sexi do you remember breh's Tutorial on thinning the hairline. This may be helpful.
yes here it is: and i'm gonna add to the newbie thread..
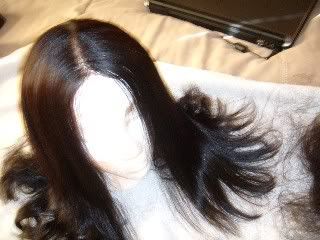
Okay, here's what you all have been waiting for. I've taken a few pics to give you all an understanding of what I am talking about. If you follow the steps that I�ve laid out you should be able to thin a hairline on any lf.
You will need hair clips, a rat tail comb, thinning shears, and tweezers.
1. With the rat tail comb part the hair. Include the baby hair and a little bit of the hair from the hairline. (Do this across the whole front section of the hairline; although it is not shown in the pics).
2. Braid the parted hair to separate the hair from the rest of the hair. Place a clip on the hair to keep the hair out of the way.
3. Part a small section about 1/8" to 1/4" in size directly behind the braided hair. This should be about 15 to 20 strands of hair.
You will start at the back of the small section of 15 to 20 strands of hair.
4. Holding the small section in one hand and the thinning shears in the other, sparsely separate about 5 to 6 strands of hair with the flat surface of the thinning shears. (Remember you are working at the back of the small section, not the front. The flat surface of the thinning shears should be as close to the knots as possible.)
5. Close the shears so that the sharp teeth cut the 5 to 6 strands that were separated.
6. Tweeze any short hairs that are sticking up.
7. Take the section that has just been thinned and place a clip on it. (Do this so you do not thin this section again)
8. Repeat the process starting at step 3 for the whole front hairline, and temples.
9. After you are done comb the hair to determine whether you like the result.
If the density is to your liking then stop, if not, then continue. Remember move very slowly until you have your desired density for the hairline. Move to sections of hair that have not been thinned yet. Do not continue to thin the same sections or you will have bald spots.
Do not thin too much. Remember your unit may thin out a little later.
This process is tedious, takes hours to complete, but if you take your time the end result will be great.
Senegalese, if you're patient and try the methods the ladies posted you'll achieve that natural look you're looking for. Take it from someone whose tried the technique.
ITA, Unladylikediva. You have to take your time. I wouldn't try and do it all in one sitting. It took me two days of working on it after work to get the density I wanted.
Senegalese
Members Profile
Send Private Message
Find Members Posts
Add to Buddy List
Junior Member
Joined: March 12 2008
Location: United States
Status: Offline
Points: 101
Here's another tutorial I use too for the crown also from Mrs. YahYah that helps too!
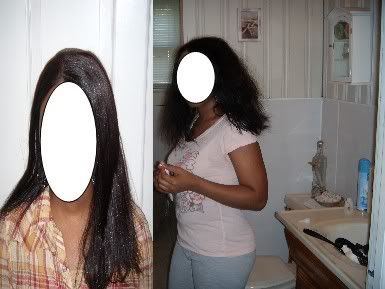
My baby came through beautifully. (thanks puppyluv) I thinned her out ALOT and put in a dark copper rinse to lighten up that harsh 1b (the color doesn't show up to well on camera. Now she is so thin, silky and natural looking. I love it and yall should have seen the chickens at Walmart whispering & looking for track lumps. And when I opened the door the wind blew threw it like "In yo face heffas!!" LOL It was a wonderful moment.
Here is a before and after pic. (ok I know my outfit lookin a stank mess on the before pic so save your jokes. We all can't wake up lookin cute LOL)
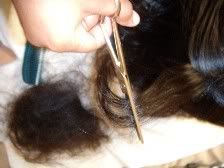
Steps to Thin for Newbies
Taking small sections of hair, clamp down the thinning shears about two/three inches from root. (I flat ironed the wig first to prevent over thinning)
Pull shears all the way through the hair. Remember how you wear your hair on a daily basis to avoid the little bristles of hair peeking through. I parted my hair and then parted it again and thinned that section.
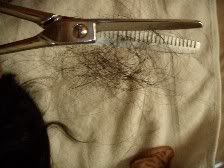
All thinnedout!!! I kept trying my wig on during the thinning process to make sure it was the perfect thickness.
Courtesy of Mrs.YahYah
Senegalese
Members Profile
Send Private Message
Find Members Posts
Add to Buddy List
Junior Member
Joined: March 12 2008
Location: United States
Status: Offline
Points: 101
You cannot post new topics in this forum You cannot reply to topics in this forum You cannot delete your posts in this forum You cannot edit your posts in this forum You cannot create polls in this forum You cannot vote in polls in this forum


 Topic Options


 Post Options
") Thanks(0)
Thanks(0)


 Asia35 wrote: